How To Export Data From IDVisor Smart, IDVisor Smart Plus, and IDVisor Smart V2
Exporting Data from IDVisor Smart/Smart Plus/Smart V2
The directions provided below explains how to export data from the IDVisor Smart, IDVisor Smart Plus and IDVisor Smart V2.
There are two ways to export data off of your Smart device, Manual Export and Wireless Export.
Manual Export: Exporting and transferring directly to PC. Requires using a PC and Micro USB/USB Type C (For new Smart Plus models and Smart V2). Does not require WiFi connection.
Wireless Export: Exporting and transferring via WiFi. Requires a WiFi connection and Gmail account (to email exported file). You may also use another app such as One Drive or Drop box to transfer the file (requires you to download app from the Google Play Store).
Manual Export:
Note: If using an Apple product please visit https://www.android.com/filetransfer/ and download the Transfer tool.

1. Select Setup from the Main Screen.

2. Select Database from list of options.

3. Select Go next to Customer File or ID Scan File.
Customer File – list of customers who have been scanned on device.
ID Scan File – list of real time scans on device.
Click to enlarge
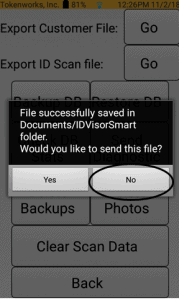
4. Select No when the Send file message option appears.
After the file is successfully exported, please restart the scanner by holding down the power button then selecting reboot. After the device has restarted, connect the micro usb cable to the device and the PC.
Note: If using an Apple product please visit https://www.android.com/filetransfer/ and download the Transfer tool.

Click to enlarge
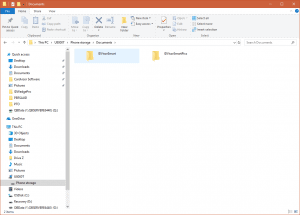
5. After the device has been connected to your PC, Go to File Explorer > U8000 device (will vary by device) > Select Phone Storage.
Note: When a Smart V2 is connected, the device will automatically use the USB connection for charging only. See the post here on how set the USB connection to be used to transfer files.

Click to enlarge
6. Select Documents.
Click to enlarge
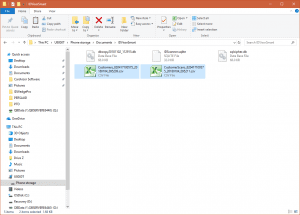
7. Select the IDVisor Smart folder.
Click to enlarge
8. In the IDVisor Smart folder you will see the exported data for either the Customer Scan file and/or the ID Scan file.
Wireless Export:
We will be using Gmail as the example for the Wireless Export instructions. As stated above you can download other apps from the Google Play Store such as One Drive or Drop Box to transfer the exported file.
Note: Ensure the device is connected to WiFi before doing the wireless export. Review steps on connecting to WiFi here.

1. Repeat steps 1-3 shown in the Manual Export option above.
Select Yes when the Send file message option appears.

Click to enlarge
2. Select Gmail after selecting Yes.

Click to enlarge
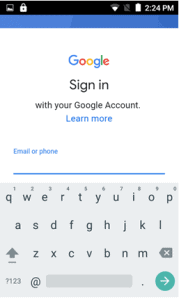
3. Skip the Welcome to Gmail screen. Then select Add an email address.
Click to enlarge
4. Log in to your Gmail account. We recommend creating a Gmail account specifically for the scanner to avoid any breach of personal data.

Click to enlarge
5. After completing the Log In process of your Gmail account, you will see a drafted email titled IDVisor Customer Export.
In the To field enter the email address of the desired recipient or self then press send.
If after attempting these steps you are still unable to export data on your device please create a support ticket leaving your Name, Business name, Phone, and email address here.
Related Articles
How To Delete Data Off IDVisor Smart/Smart Plus/Smart V2
Deleting Data off the IDVisor Smart, Smart Plus, and Smart V2 If your IDVisor Smart device is approaching full storage, you will need to clear data off of the device. This is important to keep the device performing at a high level. We recommend ...How To Check For Updates On IDVisor Smart/Smart Plus
Post Description: The contents of this post will instruct you how to update the IDVisor Smart app on your IDVisor Smart/Smart Plus device. Instructions: Follow the steps below in order to update your IDVisor Smart app to the latest version of ...How to Setup Auto Deletion on an IDVisor Smart/ Smart Plus/ Smart V2/ S50
How to Setup Auto Deletion on an IDVisor Smart, Smart Plus, Smart V2 Setting up Auto deletion on an IDVisor Smart Device If you are required by your state and/or would like to make sure customer scans are cleared from the device daily, you can enable ...IDVisor Smart, Smart Plus, Smart V2 Will Not Charge
If your IDVisor Smart, Smart Plus, or Smart V2 will not charge or you are experiencing charging issues with your device, please follow the troubleshooting steps below to correct the issue. With Charging Block and USB Cable If having issues charging ...Using a SIM card with IDVisor Smart V2/ Smart Plus
Our IDVisor Smart handheld devices have the capability of using GSM SIM cards. We recommend starting with T-Mobile but other popular carriers such as Mint Mobile and Boost mobile are compatible carriers for our device. Although carriers such as AT&T ...